Tips
How to convert all Google Drive docs to Microsoft Office with a one-way sync
We are often asked how to setup Syncdocs to create local backup by 1 way sync that converts all Google Drive files to MS Office.
I'm wanting to make a backup of my files as part of my handover when I
move onto a different role.

How can I setup Syndocs to create a local backup via a 1 way sync that
converts all files to MS office locally while leaving them as whatever
the original native format they are stored in (either google docs or
MS Office) on google drive.
Here is how to do setup a 1 way Google Drive sync.
The best way to do this is to uncheck these options on the Syncdocs Preferences Sync Tab:

and set the following settings in the Conversion option in the Files Tab:

Syncdocs only syncs changed or newer files by default. If you have had Syncdocs running before, then either:
1. Force a re-sync by quitting Syncdocs, deleting the local sync folder(s) and then restarting Syncdocs,
or
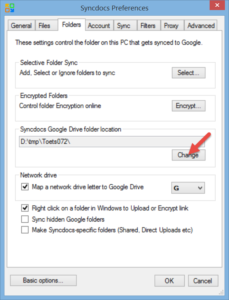
2. Change the primary Sync folder to a new location in the Folders tab:
How-to Move Google Drive files to USB
Rus asks:
I have about 40GB of google drive files in my PC, I would like to move that to USB and use Syncdocs. How to move the files to syncdocs without having to download the full files again. Please help.
It’s quite easy to do, just make sure that you keep the folder structure hierarchy.
Syncdocs can sync some Google Drive folders from the USB and some from your drive.
So if your existing Google Drive looks like this:
Folder1
Folder2
Folder3
and you want to move Folder2 and Folder3 to USB do the following.
1. Exit the Google Drive sync client
2. Move Folder2 and Folder3 to your USB drive
3. Install Syncdocs. Syncdocs will automatically detect that you had Google’s Google Drive client installed and use its sync folder.
4. At the last screen of Syncdocs install, click on the option below:

5. Then click on Select folders

6. And then on Add folder – and add Folder2 from the USB drive. Repeat step 6 for all the folders on your USB drive.

That’s it. If you already have Syncdocs installed you can just click on Syncdocs taskbar icon, and select Preferences to see exactly the same menu as in step 5.
If you want to archive some of these folders, just uncheck them from the above menu and they will stay archived on Google Drive. You can also use the advanced options sown below to only upload or download if you want.

Syncdocs multiple Google Drive account authentication problem
We have noticed that Google has recently changed their code in the “Choose Account” dialog when your need to authorize Syncdocs to Google Drive.
If you have multiple Google Drive accounts, and you just click on your account icon, Google simply refreshes the page. We have notified Google of the problem, so hopefully they fix it soon.
The solution in the meantime, is to click on the “Add account” button at the bottom, and just re-add your existing account:

We also plan on putting back the option to have a Syncdocs-specific password in the next release of Syncdocs, as Google authentication can cause issues, especially on users of Windows server, and users of the portable (USB drive) Syncdocs.
Backup to Google Drive at Login or on Schedule
Many of our users use Google Drive strictly for backup purposes. They want an option that backs up to Google Drive at login and then stops syncing until the next login.
This is easy to do with Syncdocs. The simplest method is to start Syncdocs at login via a batch file in your startup folder. The batch file should contain a line:
SyncdocsPath\Syncdocs.exe –OnlyRunSyncOnce
The Syncdocs command line option to run once is –OnlyRunSyncOnce. This option is not case sensitive.
Standard shell error reporting is supported, exit code 0 means no problems, 1 a serious error.
If you want to run at external app when syncing is done, Syncdocs can run any external program to do this after the sync to notify you. Here’s how:
http://www.syncdocs.com/how-to-run-an-application-after-syncing/
If you want to send an email at the end of a sync, then you can do so via your mail client. Here’s how in Thunderbird:
http://www.kbrandt.com/2008/05/quick-tip-tunderbird-email-from-command.html
If you wish to run Syncdocs regularly, say for backup purposes, once a day, you can add an item to the Windows scheduler, or via the Syncdocs Preferences menu.
This lets you sync once a day at the time that you specify.

How to Reliably Sync to Google Photos
 Google’s new Photos service allows you to store and share photos. It has just been spun out of the Google+ social network, and relies on Google Drive for storage.
How to enable Google Photos
This is a two step process. Firstly, in Google Drive, click on Google Photos in the left hand panel:

Secondly, Click on “OK” when asked to create the the Google Photos folder.

That’s it! It might take a while for Google to sync your existing Google Plus photos to Google Drive/Photos.
Any photos you upload to your local Google Photos folder will automatically be copied up onto Google’s photo’s service. All your Google Photos online can be synced back to your hard drive as a safe backup.
You can create folders in your Google Photo’s folder and these will be turned into Albums by Google Photos online.
Syncdocs can sync external drives, so you can mount your DSLR SD or CF memory card and have the images uploaded to Google Photos.
Syncdocs can reliably upload your photo collection. It is more reliable than using a web browser to upload as it supports resume, and works faster with bigger photos and video files.
Note that photos bigger than 16 MPixels and large video files count towards your drive quota, which is 15GB for free users. To check the contribution of Google Drive/GMail/Google Photos to your space usage, click on the quota usage menu in Syncdocs.
How to sync multiple Google Drive accounts
Syncdocs makes it easy to sync multiple Google Drive accounts at the same time. Here’s how to sync multiple Google Drive accounts simultaneously:
The easiest way to set up multiple Google Drive accounts
1. Click on the Syncdocs taskbar icon
2. Click on Preferences.
(If you see the basic preferences, click on “Advanced” button)
3. Click on the Account tab, and then run the Wizard.
That’s it. You’ll be taken through a step by step process setup a second Google Drive account with Syncdocs.
More advanced multiple account setup
If you want more options on setting up multiple Google Docs and Drive accounts, see this post.
To start multiple accounts syncing when your PC starts see here.
How to change the names of the Syncdocs sub-folders
By default, Syncdocs creates some folders in your Google Drive folder. These folders are:
- OriginalsBackup – this stores backups of any files that are converted to Google Docs format. Google can destroy some formatting in Word and Excel, so original files are kept here as a a backup. The backup of your Google contacts list is also kept here.
- DirectUploads – files uploaded from the Windows Explorer context menu via right clicking on a file and selecting “Upload to Google Drive” are put here.
- Public Share – files shared via right clicking on them are put here.
These folder names can be changed, but you’ll need to edit the Syncdocs settings file to do it. Here’s how:
The settings are stored in the file appsettings.xml which is typically in the folder c:\Users\Username\AppData\Roaming\Syncdocs\
Change the folder name settings.
1. Exit Syncdocs.
2. Edit one of the following fields to the folder names that you want. (You can edit the appsettings.xml file in Notepad or any other text editor).
<DirectUploadSubDir>DirectUploads\</DirectUploadSubDir>
<SharingSubDir>Public Share\</SharingSubDir>
<BackupPath1>D:\tmp\OriginalsBackup\</BackupPath1>
<BackupPathMerge>D:\tmp\OriginalsBackup\MergeTemp\</BackupPathMerge>
3. Re-run it Syncdocs.
Future versions of Syncdocs will make the creation of these folders optional, so they don’t clutter your Google Drive root folder.
How to sync multiple Google Drive accounts concurrently
A new feature of Syncdocs is the ability to sync multiple Google Drive accounts at the same time. Previously you were limited to one account per sync.
Why would I want multiple accounts?
You might want to keep your work Google Apps and personal Google Drive accounts separate.
If you are running a backup server, you might want to sync everyone on your Google Apps domain to the server, but keep their Google Drive data synced to separate folders.
Perhaps you are a web-designer or consultant and work with various different customers at the same time, and need to keep their data in sync.
How to setup multiple account Syncing
Previously Syncdocs only let you sync one account at a time. You could switch accounts, but not use both concurrently.
To setup multiple Syncdocs, do the following.
1. You’ll need Syncdocs version 1.23 or later. If you don’t have it, download and install the latest version
2. In the Preferences -> Account Tab there are two new buttons, marked “Make Shortcut” and “Use Now”

3. Select the other account you want to use.

4. “Use Now” button runs that other account concurrently when you press the button.
5. “Make shortcut” button makes a shortcut. This shortcut runs the other account. The shortcut is put on your desktop, but you can move it where you want. The shortcut is shown below. It is given the title of your gmail account (“syncdocs.test” in this case) so you can distinguish it.

You’ll see a different colored shortcut icon on the taskbar for this other account.
![]()
You can have as many accounts running concurrently as you wish.
Things to watch out for with multiple accounts
Watch out for confusion with multiple accounts running at the same time.
Right click uploads are always the first account
The context menu items that are shown when you right click on a file in Windows explorer (like “View in Google Docs” ) are linked to the first (main) instance of Syncdocs that is run.
Identifying accounts
If you hover your cursor over the secondary taskbar icons it will show you the account name, and the name is also shown at the top of the menu:

The name of the account is also shown at the top of the status menu:

Google Drive Encryption
 The great thing about putting files in the cloud is that they are easy to share. The downside is that others might get access to data you want to keep private. The recent news about the PRISM program and the NSA having access to online data has made online encryption an essential feature.
Syncdocs securely encrypts your files before uploading them to Google Drive. This means that no unencrypted data ever leaves your computer. Your files are securely encrypted, and only you have the key.

If you do want to share files, you can easily share encrypted files with others provided they have the password, which you can revoke at any time. You can also partition your folders into secure, private and public sections, with different encryption settings on each.
How to encrypt files on Google Drive
1. If you haven’t already, install the free version of Syncdocs.
2. In Explorer, right click on the file or folder to encrypt, and select the option “Encrypt to Google Drive”

3. If this is the first time you’ve encrypted with Syncdocs you’ll be asked to enter a password.

4. That’s it – you’re done. All files in these folders will be encrypted online with secure AES256 encryption, and only available on your PC.
If you look at encrypted folder on your PC it will have a lock icon.

while online, all your files in this folder will have “g_encrypt…” appended to their name.

Syncdocs encryption is transparent, once set up, your files are automatically encrypted online, and decrypted on your PC.
You can securely share the contents to anyone you wish to authorize, and if they have Syncdocs and they will automatically get the files, otherwise we also have a free stand-alone decryption app.
More on securing Google Drive with encryption:
- There’s more detailed information on the encryption settings
- Information on secure sharing and syncing many PC’s
- How to encrypt many existing synced folders at once
- Google Drive Encryption FAQ for common questions and answers
- Best practices on keeping your Google account secure.

Ignoring certain file types when syncing to Google Drive
The normal way of selecting what syncs is to select the folders in the selective sync menu in Syncdocs.
However, more advanced users may wish to ignore certain types of files or folders based on the name or attribute. Here’s how to do it.
Advanced file and folder exclusion
For advanced users, Syncdocs can be set to ignore specific file names or file types.
Note that doing this requires editing a settings xml file. You can break your Syncdocs if you destroy this settings file. If you do break the settings, you can repair Syncdocs, either by re-installing it, or by clicking on the “Default Settings” button in the Preferences.
To set which file types sync, first exit Syncdocs.
Then edit the settings file called appsettings.xml in the folder:
c:\Users\your_username\AppData\Roaming\Syncdocs\user_name@gmail.com\
and edit the section “FileAndFolderNamesToIgnore“
Not syncing certain file or folder names
To ignore all files called “thumbs.db”, add thumbs.db to the list:
<FileAndFolderNamesToIgnore>
<string>thumbs.db</string>
<string>.dropbox.cache</string>
</FileAndFolderNamesToIgnore>
Files or folders (collections) in this list will be ignored.
Not syncing certain file types
Syncdocs can also ignore certain extensions:
<ExtensionsToIgnore>
<string>.lnk</string>
<string>.LNK</string>
</ExtensionsToIgnore>
The above will ignore all .lnk and .LNK extensions.
Extensions are case sensitive.
Ignoring Hidden Files
Many programs create hidden temporary files. Syncdocs ignores those used by common apps (like MS Word and Excel) by default.
You may also tell Syncdocs to ignore hidden files by setting this value in appsettings.xml
<UploadHidden>false</UploadHidden>
<ShowHiddenFiles>false</ShowHiddenFiles>
Restart Syncdocs when done.