How to sync Google Drive as a Windows Service
Running an app as a service on Windows allows it to run at system startup and not require any user to login. Syncdocs is designed to interact with the user, but can easily be run as a Windows service.
Here is a guide on running Syncdocs as a service, which allows it to run automatically without anyone logging in.

1. Setup Syncdocs as normal
Install Syncdocs and set it up normally with the preferences that you want via the normal user interface. You will need the latest Syncdocs version 6.723 or above.
In the Preferences menu, tell Syncdocs not to “Start with Windows startup”. The service manager will now start Syncdocs.

Exit Syncdocs.
2. Install the service manager
Syncdocs will be run as a service via a service manager. We recommend NSSM, which is free. Srvany.exe from Microsoft Windows 2003 Resource Kit (available free from Microsoft) can also be used, in a way very similar to that outlined below with NSSM.
NSSM is better than Srvany in most regards. The most important is that it works well on Windows 10/8/7 or Windows 2012/2008 Server.
Install NSSM and open an administrative command prompt in the nssm win32 or win64 folder, depending on whether you wish to run the 32bit or 64bit version of Syncdocs. This guide assumes the 32 bit version, but the steps for the 64bit version are almost identical.
Type the following in the command prompt:
nssm install Syncdocs
3. Setting up the Syncdocs service
You will then see the following screen.

Use the button to set the Application path and Startup directory to where Syncdocs is installed, usually something like C:\Users\sduser\AppData\Local\Programs\Syncdocs\Syncdocs.exe
You can also provide command line arguments for Syncdocs.
In the Details Tab, you will need to provide the display name and description.

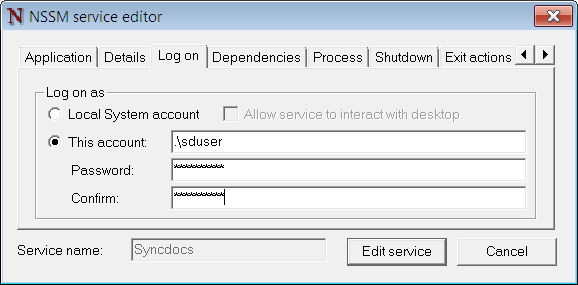
In the Log on Tab, you will need to provide the account username and password that you were logged in as when you first setup Syncdocs.
That’s it. You can finalize the service creation by clicking on Install Service

Setting up the Syncdocs
4. Controlling the service
You can control the Syncdocs service just like any other via the service manager.

5. Changing Syncdocs settings
To change any Syncdocs settings, simply stop the service via the service manager and run the Syncdocs app normally. You can then change settings via Preferences as normal.
6. Changing service settings
To edit the service settings via nssm, type the following in the command prompt:
nssm edit Syncdocs
This will show you the same settings Tabs shown at setup time.
7. Advanced Settings
Multiple users
Syncdocs can sync up to 16 users concurrently. To setup multiple concurrently syncing Google Drive users, create a new service for each user:
- name each service separately, eg Syncdocs-User1 in the “Display name” item in nssm, and
- specify the command line arguments to specify the user, eg. “–u user1@gmail.com”
Command line based setup
The user interface is not the only way to setup NSSM and Syncdocs. NSSM can be setup via the command line. Syncdocs also allows for advanced scripted setup via the command line.
Running the service under the “Local System Account”
Syncdocs can be run under the local system account, instead of the a specified user account. For this to work, you will need to specify the –portable setting when installing and running the service. The startup directory will also need to be correctly specified.